Posts

Owl Birthday Card

Image
So here's a cute owl card that I made using Lettering Delights  Mulberry Lane SVG file.  My niece just loves owls, so I had to give it to her for her birthday. It's extremely simple to make: I used LD Mulberry Lane file: Owl and two trees For the paper I used scraps and to make the trees pop out when the card is opened I accordian folded two strips and attached to the back of the trees. For the texture on the inside I used one of my cuttlebug embossing folders. Hope you're having a fabulous day.

Fun Birthday Card

Image
I wanted to share a fun girly card that features the chandelier from my Home Decor Cricut cartridge.  I welded the letters together in Make The Cut, and added some black and white checkered ribbon. In the inside I made the other half of the chandelier pop up along with the word PARTY. I blinged it up a bit with some stickles and rhinestones, and used foam tape for the outside title to make it pop a little more.  Thanks for looking! Hope your are having a great weekend!

Penguins on Parade

Image
I just love this penguin from SVG Attic's All the Trimmings file. I used scotch foam tape to give them dimension, and my cool gray Copic marker for shadowing. Each card features Punkin Patch Stamps : Holiday Traditions, O Holy Night, Gingerbread Kisses I also used Trendy Twine 's peppermint stick twine some magnets and a snowflake and circle punch. So each penguin is a magnet and behind each penguin is the card title. To make it attach to the front of the card I added a piece of magnet tape to the back side of the white cardstock, so you can't see the magnet.  They look so festive...the paper stack I used is Recollection's Believe paper pad. These stamps really quality stamps and they are perfect for the inside sentiment, I mixed and matched to say what I wanted. I added rhinestones to the inside of the flower and the snowflake. This is how big the piece of magnet is for the penguin, not much is needed. Look at that army! ...

Christmas Blessings

Image
Hello all, I have been vacant from posting due to school...(blech) but now I am free! I just finished my last two courses that qualify me for my AA degree (only took me forever to get to this point), so I am so excited to be finished with that portion of school. Now on to some fun stuff!  I have made a lantern for Halloween and Fall, so I thought I would stick with the theme and make one for Christmas to give to my sister since she doesn't have much in the way of Christmas decorations. I took these pictures with the tealight led, but I gave her a color changing light too, so she can swith it up. My nephew (he's 7) took a look at both and decided he liked the color changing light the best, and wanted to put it in his room...I guess they can share. I will start by crediting Mod Paperie with the idea project she posted, hers is totally awesome and her details are ridiculous (in a totally awesome way of course)!!! On to the project... Here are the supplies I...

Fall Explosion Box

Image
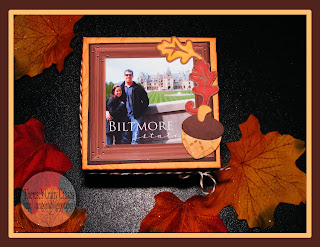
So at the beginning of October, my husband and I went to Asheville for our second trip to the Biltmore Estate. We went in 2009, and absolutely loved it, but didn't have time to see everything. This trip we saw everything we missed last time, including all of the gardens and the Butler's tour.  I always recommend this place to everyone, it is so beautiful in the Blue Ridge Mountains, definately worth the trip! So, on to my Biltmore inspired project.  I had a bunch of pictures...of course!  And I wanted to use them all!!! But I could only pick my favorites and chose an explosion box to show case them. This is my first time making an explosion box, but I loved it! I used SVG Cuts Explosion Box set, but since I only have a 12x6 Cricut...I had to hand cut the actual boxes, using the template as a guide. I did cut the box cover out on my machine just fine though. For starters, I picked all of the pictures that I wanted to display in my box, I have a total of ...

Happy Fall Everyone!

Image
Ok, so it's been fall for a while, but I always put up my fall decor after Halloween, since my place is always decked in Halloween goodness all of October.  So this was a picture taken on our way down the Blue Ridge Mountains in North Carolina.  I have a project inspired from this trip with the pictures I took from this trip coming soon... Stay tuned!

Black Pumpkin {Trendy Twine Challenge #2}

Image
Trendy Twine has a challenge where you have to use a pumpkin or Jack O' Lantern and some Twine on the project. For my project I used SVG Cuts Pick a Pumpkin kit to create this great candy holder...It just needs candy...I ate it all :o I did some embossing on all sides of the pumpkin, and I used K&Company's Halloween paper pad to add different papers to wrap around it.  I also used different Halloween ribbons that I got at Michaels and some black and orange Trendy Twine as well as some wire around the stem. Have a look see: I wanted to be able to pick up the pumpkin by the stem without the lid falling off, so I added adhesive backed black velcro dots that I got in the craft department at Walmart. The candy corn is aslo from SVG Cuts, their Vintage Halloween Party Bag kit. Happy Spooks to you!